Multi-Node Installation of Oracle EBS (Apps) R12
This post describes how to install Oracle EBusiness Suite AKA Oracle Apps, R12 in multi node environment on linux.
EBS software version - 12.1.1
OS - RHEL 5.5 32 bit
DB Node - appsdbnode.localdomain, require around 45-50 GB for Fresh installation and around 120 GB for Vision DB installation
Application Node - appsnode.localdomain, requires around 30-35 GB for application tier file-system
Staging (over NFS) - 192.168.1.14:/var/ovs/mount/600E49F9AFBA4C82B97000DA02088110/iso_pool/FinalAppsInstaller
Since we are doing multiple node installation, we have to make sure that both nodes have installers available to them.
So one way, either you make two copies, one on each individual hosts or use some shared drive mechanism.
I used NFS to stage the installers and mount NFS mounts on local mount points.
In this case I am creating a stage on 192.168.1.14 host.
You can download the software from http://edelivery.oracle.com
Following is the list of files you need to download and unzip in your staging location in order to install EBS
B53824-01_1of4.zip
B53824-01_2of4.zip
B53824-01_3of4.zip
B53824-01_4of4.zip
V15564-01_1of3.zip
V15564-01_2of3.zip
V15564-01_3of3.zip
V15565-01_1of2.zip
V15565-01_2of2.zip
V15566-01_1of3.zip
V15566-01_2of3.zip
V15566-01_3of3.zip
V15567-01_1of3.zip
V15567-01_2of3.zip
V15567-01_3of3.zip
V15568-01_1of3.zip
V15568-01_2of3.zip
V15568-01_3of3.zip
V15569-01_1of3.zip
V15569-01_2of3.zip
V15569-01_3of3.zip
V15570-01_1of3.zip
V15570-01_2of3.zip
V15570-01_3of3.zip
V15571-01_1of3.zip
V15571-01_2of3.zip
V15571-01_3of3.zip
V15572-01_1of3.zip
V15572-01_2of3.zip
V15572-01_3of3.zip
V15573-01_1of3.zip
V15573-01_2of3.zip
V15573-01_3of3.zip
V15574-01_1of3.zip
V15574-01_2of3.zip
V15574-01_3of3.zip
V15575-01.zip
V15576-01_1of3.zip
V15576-01_2of3.zip
V15576-01_3of3.zip
Login to the appddbnode/appsnode as root user -
[root@appsdbnode ~]# showmount -e 192.168.1.14
Export list for 192.168.1.14:
/var/ovs/mount/600E49F9AFBA4C82B97000DA02088110/iso_pool/FinalAppsInstaller *
[root@appsdbnode ~]# service nfs restart
Shutting down NFS mountd: [FAILED]
Shutting down NFS daemon: [FAILED]
Shutting down NFS quotas: [FAILED]
Shutting down NFS services: [FAILED]
Starting NFS services: [ OK ]
Starting NFS quotas: [ OK ]
Starting NFS daemon: [ OK ]
Starting NFS mountd: [ OK ]
[root@appsdbnode ~]# service portmap restart
Stopping portmap: [ OK ]
Starting portmap: [ OK ]
[root@appsdbnode ~]# mount.nfs 192.168.1.14:/var/ovs/mount/600E49F9AFBA4C82B97000DA02088110/iso_pool/FinalAppsInstaller /appsinstall/
[root@appsdbnode ~]# cd /appsinstall/
[root@appsdbnode appsinstall]# ll
total 1024
-rwxrwxrwx 1 root root 754 Apr 26 20:42 filelist.txt
drwxrwxrwx 70 root root 3896 Apr 26 20:17 oraAppDB
drwxrwxrwx 14 root root 3896 Apr 26 20:32 oraApps
drwxrwxrwx 5 root root 3896 Apr 26 20:20 oraAS
drwxrwxrwx 9 root root 3896 Apr 26 19:26 oraDB
drwxrwxrwx 4 root root 3896 Apr 26 20:38 R12.1.2Patches
drwxrwxrwx 6 root root 3896 Apr 26 20:41 startCD
-rwxrwxrwx 1 root root 512668 Apr 26 20:33 unzip
Once unzipped you need to navigate to startCD/Disk1/rapidwiz directory.
Here you will be able to see rapidwiz executable
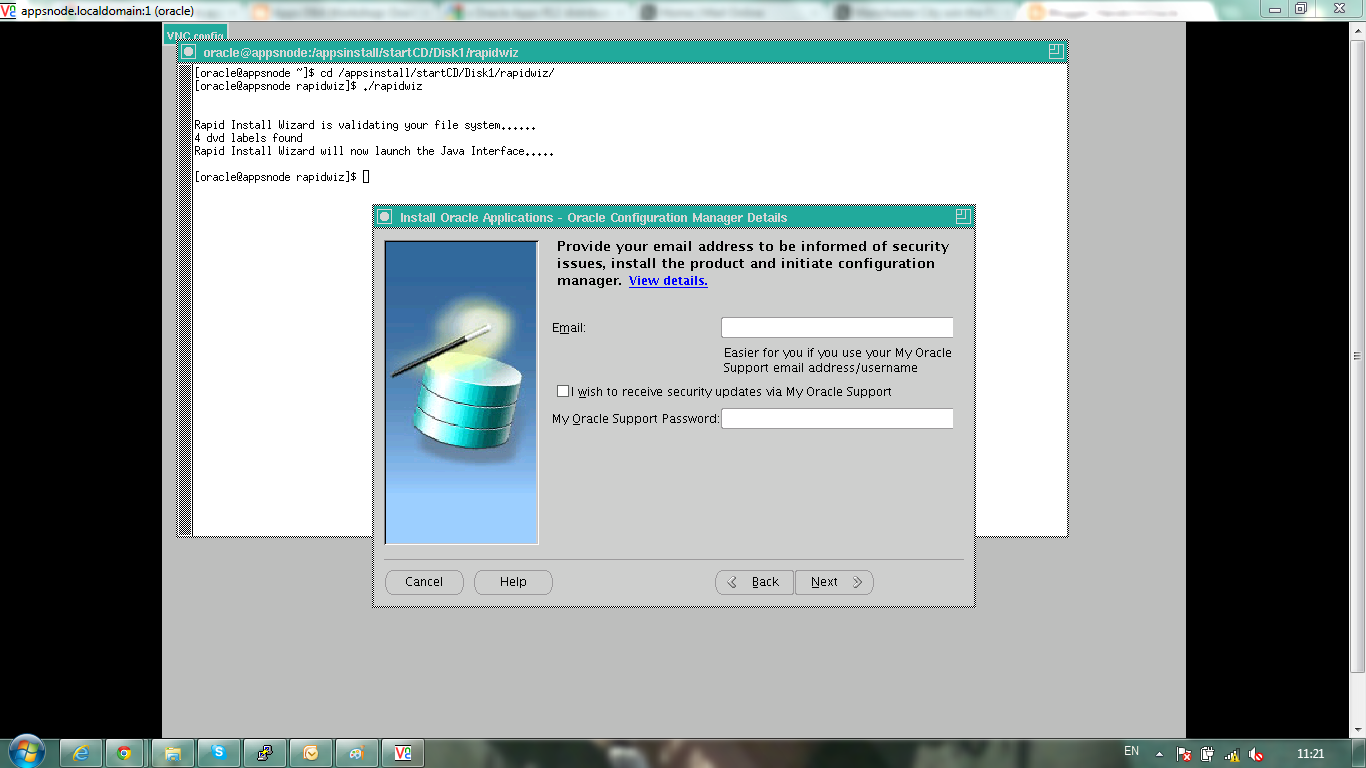
# ./rapidwiz

Select the Oracle Applications Release 12.1.1

Select suitable option if you need to download updates

Select [New Configuration]

Select the port pool, I have chosen the default i.e. 0, for my env.

Enter DB host info along with user and group

Select [Suite Licensing]

Install the languages if you need multi-lingual support

Select the Internationalization Settings

Enter Application Node info along with owner and group

Review the info you entered for hosts. You can also add Additional Nodes here for Application tier file system

Now the OUI will perform the pre-checks before the actual installation kicks in

Review the Validation Report. check the failed ones and click on Retry

Installation will kick in, keep an eye on it. It will usually take around couple of hours depending on the speed of your machine

Once installation completes, the post install validation box will reappear. Make sure everything is green before going further


At the end, click on Finish to end the installation of DB tier.
Next step is to install the application tier on appsnode host.
Before you start the install of the App tier you need to copy the config file from DB tier to apps tier.
To do this there are two ways
1. Copy <sid>_<host>.xml file aka context file to appsnode
2. start the install by issuing ./rapidwiz and provide the DB details to copy the config from DB
One can copy context file as follows

[oracle@appsdbnode appsutil]$ cd /u01/app/oracle/visr12/db/tech_st/11.1.0/appsutil
[oracle@appsdbnode appsutil]$ scp conf_visr12.txt appsnode:/home/oracle/
conf_visr12.txt 100% 13KB 12.8KB/s 00:00

click on [Saved configuration] option, and enter the path copied context file

check the validation report to make sure everything is healthy.

Click on [Next]

Review the progress of the installation

After install was finished, my post install checks failed as my HTTP server failed to start hence all other dependencies failed

Cause -
After a bit of research I found out that the start failed due to the fact it failed to locate on library component and fix is the create the link for that missing component
Solution -
[root@appsnode ~]# ln -s /usr/lib/libgdbm.so.2.0.0 /usr/lib/libdb.so.2
[oracle@appsnode scripts]$ adstrtal.sh apps/apps
[oracle@appsnode scripts]$ adopmnctl.sh status
You are running adopmnctl.sh version 120.6
Checking status of OPMN managed processes...
Processes in Instance: visr12_appsnode.appsnode.localdomain
---------------------------------+--------------------+---------+----------------------
ias-component | process-type | pid | status
---------------------------------+--------------------+---------+----------------------
OC4JGroup:default_group | OC4J:oafm | 31135 | Alive
OC4JGroup:default_group | OC4J:forms | 31070 | Alive
OC4JGroup:default_group | OC4J:oacore | 30984 | Alive
HTTP_Server | HTTP_Server | 30933 | Alive
After manually start the opmn stack, I click on [Retry] on validation page of installer and there you go. Everything came up

click on [Finish] to end the install

Post install, I tried to login to Apps console using following URL.
URL Format : http://<hostname.domain>:<port_pool_no>
URL - http://appsnode.localdomain:8000
use default credentials - sysadmin/sysadmin to login console

That's it. You have now successfully installed the EBS R12.1.1 successfully.
Next -
Apply 12.1.2 or 12.1.3 RUP to Apps R12 (12.1.1)
No comments:
Post a Comment